Prolific Adornments - With Age Comes Beauty

Prolific- profusely productive or fruitful Adornments-ornamentation; embellishment
Showing posts with label reworked recyling upcycling. Show all posts

Tuesday, May 10, 2011

New Fanci Stuff

Yes, I spelled it Fanci with an "i" because I got a box of stuff from Fanciful Devices! She recently went to  Uruguay and now her stash is overwhelming, so she decided to sell some lots of things. I wish I could get the awesome stuff she found in U, but I guess I would have to take a trip there myself to get the realllly awesome stuff. (a few of the pieces was from her U haul)  I did however, get some cool things from her! Here's a few pics....

Opening the box....
 These babies are BIG and Heavy! Might use them for cuffs or pendants.
 Check out the clay pipe piece and the little hourglass!
 Stuff stuff stuff!

 The little plate is chipped, but still cutie patootie!
Neato "Seed" eraser! 
 I can't wait to start playing with this stuff!


There was a ton of little beads, rhinestones, buttons, etc. Awesometastic! I'm ready to playyyyyyy!

Friday, January 28, 2011

Mail Call!!

 I got two packages of goodies in the mail. Yeeehaw!

This batch of goodness I got from 2BCreative on Etsy. Isn't the Rouge tin adorable!?!?! It still has rouge and the little applicator inside :)
These totally cool tins and patinaed shapes came from EmmasMuse on Etsy. I only got 2 of the arched ones in the batch. I wish there were more of those.

I can't wait to get my stupid paperwork done so I can get to playing! :)

Please excuse the picture quality, I took these with my phone with the stuffs sitting on white paper on my desk under a desk lamp. lol

Wednesday, December 8, 2010

New Things and Possibly a New Line of Jewelry

Ahh, I got rid of the puter virus and am back to normal (however normal you could call me) I really haven't been making much lately. I dunno, I just got burnt out and needed a break. Anyways, here are a couple things I made recently.
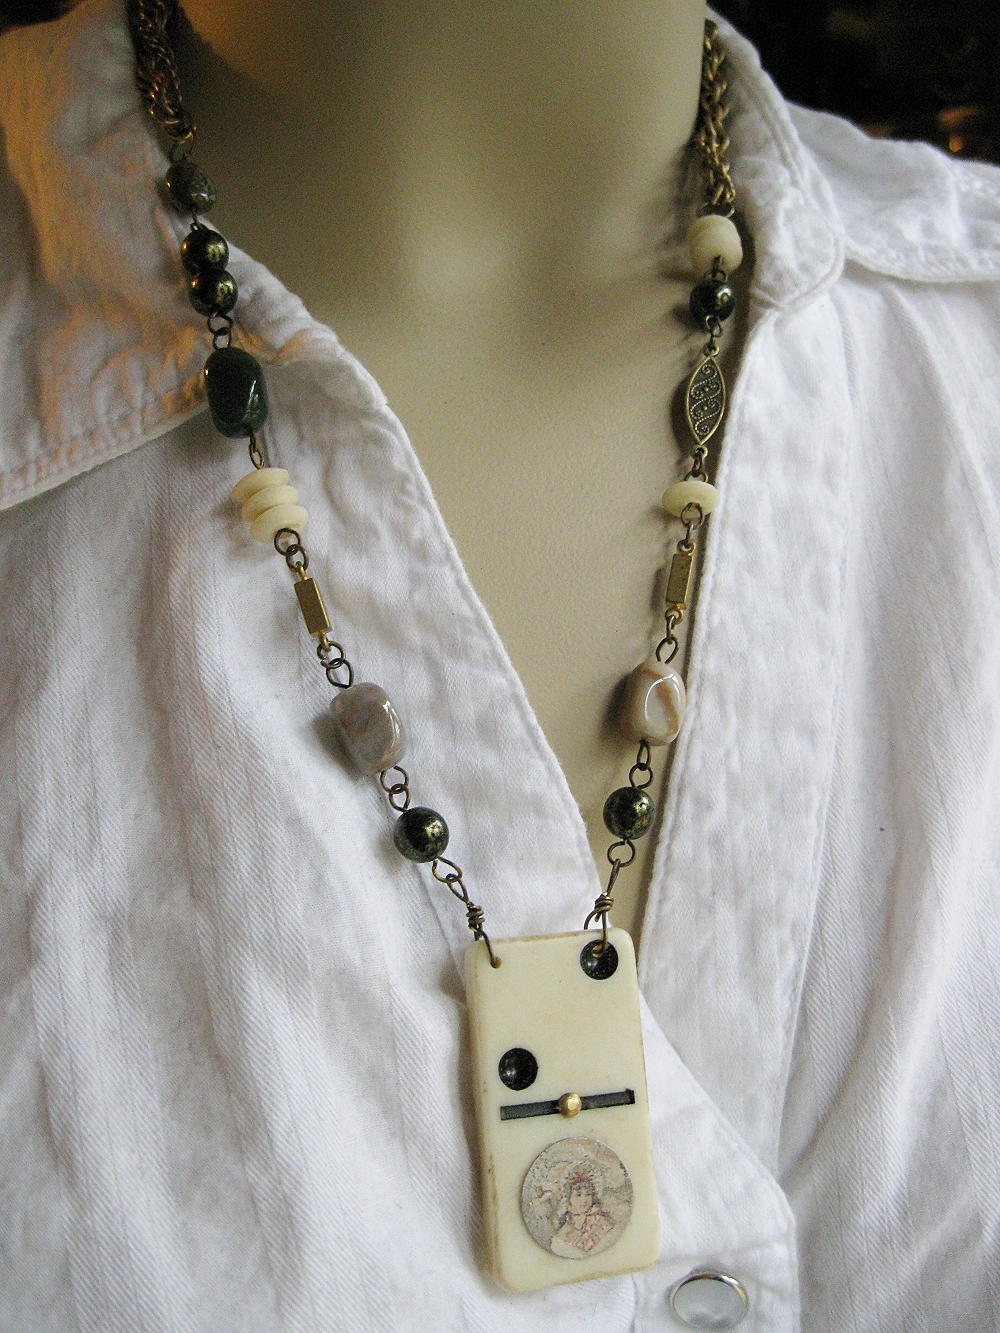
 This necklace started off with a couple things I got at the flea market: the domino, which I roughed up and aged and the little girl disk. It came from the tin lid I got here.


There is, as (almost) always, a lot of recycled components. The girl from the tin, the domino, the white spacer beads and the two lengths of chain. The brass connectors are all vintage, but I don't know for sure if they are used or "new" vintage.


I really like jewelry pieces that "mean" something. The domino piece is a talisman necklace for family. The 2 dots on the domino represent man and woman. The little tin disk represents the child. One meaning of green is harmony... jasper represents help in childbirth- and there is a lot of jasper on this necklace. 

This piece started with a cool wooden cheetah.The cheetah, wooden beads and pearly chain came from the flea market stuff here. The elephant came from more flea market stuff here.


This piece is for getting things done. The cheetah represents intent, focus and making things happen quickly. The elephant is for strength, wisdom and power.  Green again is for harmony. When you are trying to get things done, harmony is certainly helpful!

Blue is representative of inspiration and devotion.

I haven't decided on how to name my new talisman pieces. I will have to think on that. I need to decide soon though so I can get them listed. lol

Saturday, November 20, 2010

Inspiration Bracelet

Here I told you about the newest challenge from My Life Under The Bus. Well lemme tell you. I had a terrible time with this challenge. It wasn't because the palette wasn't inspiring; I LOVE the colors! It wasn't from a lack of materials. I have tons. It was because this week I have been stuck in a rut. Everything I have tried working on has ended with me getting tired of sitting at my work bench and getting up frustrated. My creative streak is G O N E. I even wrote out a whole post about how depressed I was over not being able to create, about how I could not get a thing done. It sounded so depressing that I never did post it for fear of running off my few readers. lol.

So this was reallllllllllly a challenge for me. I probably put together and took apart my piece a dozen times. It started as a bracelet, then changed to a necklace, then a half a dozen arrangements as a necklace and another half as a bracelet again. I finally settled for what you see here. So without further ado, here ya go. My LABOR of love. lol.

I know it is pretty simple, but it took a lot of tries just to get something I didn't hate with a passion. I chose the darkest of the red-ish colors and gray from the palette.


 I literally just finished it, took the pic with the camera on my phone and made this post. Talk about last minute! I should have lightened the photo a bit, but I just wanted to get it up on my blog so I can go to bed! lol

Btw, as usual, there are recycled components. The large silver rings and the curved beads are from old jewelry :) 

I can't wait to find out what everyone else has created and I hope it was not such a challenge for the rest of the participants. :)

Thursday, November 18, 2010

New Techniques- Ice Resin

I bought some Ice Resin a couple of months ago, but I have been afraid to play with it. I tend to do that- buy new things but not get around to them for a while.

I bought some old rusty lids which I showed here and thought this would be something fun to use with the resin. 
Here are the results:

For the left one, I left the lid the way it came. I added a dried flower and some text. For the one on the right, I first used a patina on it to make it almost black. Then I added a flatter dried flower and text.

I mixed the minimum amount of ice resin suggested, (1/4 oz each of part A and part B) let it sit for 5 minutes, then drizzled it over the lids. I had a LOT of resin left, so I half filled some frames which I sell in my bead shop. I still had a lot left so I grabbed a piece of ephemera paper and coated that too! Note to self and others trying resin for the first time: Always have plenty of things prepared to use resin on. You won't believe how far that stuff goes!

I am very pleased at how the pieces came out. Of course you have to allow it to cure for 3 days, but you can work with the pieces (carefully) after 6 hours.  Although things went pretty much faultless, there are a few things I learned in my first experience with Ice Resin.

1. Always have plenty of things ready to coat/fill with resin. I would rather have too many things prepared than to waste unused resin.

2. Always stick loose pieces down. I thought that pouring the resin on the flowers and text would hold them down. Wrong. They tried numerous times to float up on me and I had to use toothpicks to keep pushing them back down.

3. Watch for bugs. Wait, what? Yeah. I had put my Ott lamps over the pieces for a little while after I poured them so that it would help with raising bubbles to the top. I went out of the room for a few minutes and when I came back, a skeeter hawk (dunno if that is their real name but that's what we call them in the South) had landed on the piece of paper. (Guess he was attracted to the light and the paper was like 9 inches below it.) He had gotten into the house earlier last night but was in my living room which has a vaulted ceiling, so I could not get him out. I didn't even know he had made it to my studio/office.  Man that was NOT fun, pulling him out of the resin. I am terrified of bugs. My hubby said I should have just left him there but I don't care to sell resin coated bugs. lol

4. If you do add pressed real flowers as I did, you may want to coat them with mod podge or something before using them. I knew that the resin would make the paper more transparent, but it also really made the flatter flower very transparent. I wish I had coated it. The thicker flower turned out great!

5. Watch videos and read tips online. There are a lot of resin videos out there on the web. After watching a few, I felt confident that I too could use resin! It really is easy and fun!

I can't wait to make some cool jewelry out of the pieces I made :D

Saturday, November 13, 2010

Today's Flea Market Finds!

Today hubby and I went to Smiley's flea market and I got some goodies. Not a ton, but some cool stuffs.


Some love-ely junky jewelry


An awesome cookie tin which I intend on cutting up and making charms from :D


 This sweet old guy was selling old silverware. I was looking at it and he told me that he had done really well with it today and that if I wanted what was left, he would make a good deal with me. He certainly did and I came out with a ton of it.


I mean seriously!! You cannot get this lovely patina from a bottle or from liver of sulfur. My little heart is just going pitter patter over the verdigris and blackened pieces :D *love*

Riding The Inspiration Bus Reveal


Another Saturday, another reveal day for the My Life Under the Bus Inspiration Challenge! If you have not read about it before, Patty gives us an inspiration picture, which our color palette comes from.

I started out with this piece.(of course I always have to recycle something) It was originally a beaded brooch. I removed part of the back and the center section of beads and then added the yellow/orange rose to the center.


 I then searched my bead boxes and found an array of amber, glass and ceramic beads to match the  brooch. Check out how the green beads in the brooch match the green ceramic beads perfectly! Old and new- perfectly matched!


The completed piece 
 I created a clasp from brass and hammered it. The "ring" it hooks into was part of the middle of the brooch that I removed to add the flower. It turned out to be the perfect ring!
 So there ya go, my piece for this week. Old and new :)

Friday, November 12, 2010

Mail Call!


 I got some new goodies in the mail today and wanted to share!

Check out these cool rusty curved bits. 


These are so cute! I have no clue what they are and neither did the seller. lol. They are solid and have some weight.  Love them!


Some abused bottle caps. There are two of the "USDA ORGANIC" ones. Awesomeness!
Some little strips of rusty metal.

All of these items came from pvcatalina on Etsy. She sells nothing but rusty bits and bobs she finds during her walks out in New Mexico. I love to recycle/upcycle/reuse old junk! Oh and her prices are AWESOME. Each batch you see here was $2. Yes, just two bucks each. She also refunds overages in shipping. This lady is obviously just out to clean up the world and not make money. I hope she lists some more goodies soon. I need more! lol

Wednesday, November 10, 2010

Newly Posted Today

The Descent of the Muses
 This purdy thang was created with a broken pendant from one necklace and beaded chain rescued from another. Lovely lovely :)


This bracelet was created with new and rescued components. The pretty porcelain rose charm actually  has a few chips on it, but I used it anyway, cause that's how I roll! :P I know it's Winter and this is pink, but I don't care about that either! So THERE! lolol


Oh My Heart

Sunday, November 7, 2010

Weekend Work So Far

My daughter and her kids are out of town for the weekend, so I've been trying to get some work done. I babysit for my daughter when she works nights.

I've been having fun making grungy looking stuff. It really is what I love. I have made a lot of "pretty things" for my Designs By Debi shop, (the pearly earrings in the pic are prolly going in that shop) but for myself, I love grunge. When I opened Prolific Adornments, I told myself that this shop would be where I could do whatever I pleased. And grunge pleases me! lol

I used to only grunge up copper or brass or sterling, since liver of sulfur works great on those metals.Since most of my junk stash is old costume jewelry, most of it is plated. I've been experimenting with different methods of grunging it up. Normal patina methods don't work on those items and what works on one type of finish doesn't work on another.  I also wanted to get a texture to the pieces, not just a color change.

I would love to be a fly on the wall in Fanciful Devices' studio. She has it all down pat. She creates the most awesome grungy items! But that's ok, I am slowly figuring things out on my own. It's nice to have your own methods anyway. Makes you feel accomplished or some crap like that.

I'm working on some more glass slide pendants also. Honestly, the insect one in my shop now is my first! Previously, my soldering was always with metals and a torch. I'm new to this whole solder iron thing. It is fun! It's also nice to solder without bringing out the bottles of fuel and oxygen, solder bricks, torch parts, fire extinguisher, etc, etc,... and the big flames. lol

These pendants haven't been soldered yet, just copper tape wrapped. I have a lot of ephemera type papers in my scrapbooking stash, so it's nice to finally use them since I haven't been scrappin' in such a long time.  A lot of the things I previously bought when I was living and breathing scrap booking almost 24/7 are things I can use in jewelry! (now that I am living and breathing it almost 24/7)  Yay!

Saturday, November 6, 2010

Under The Bus Again

It's Saturday and time for the next Inspiration Challenge from My Life Under The Bus!

Here is the inspiration photo and color palette Patty gave us to work with. 


Ok, we have reds, grays, blues.....
Drum-roll.... Here's my inspiration piece.

I started with the beads. Red, blue and gray. The red and gray beads are from old necklaces that I have taken apart. The gold spacer beads are from my "gently used" stash also.

The blue beads are lovely detailed acrylic beads that I sell in my supply shop, Sweet Georgia Beads.


The compass pendant is from my up-cycling stash also. It looks like the gold part is all one piece, with the colors filled in. It's very cool and unique. The loop had broken off, so I drilled holes in the top to hang it from.


I added a pretty peanut shaped chain. (again, used)

I really do love up-cycling and reworking old parts and broken jewelery.  It's the best way to get truly unique pieces.

So that's that! Please do leave a comment and if you would like, follow me :D

Saturday, October 30, 2010

Saturday Flea Market Shopping

I managed to make it to the flea market this morning. I found some pretty cool stuff.
 -Some old jewelry to remake into new things
-A pack of dominoes to beat up and age
-Three pairs of gloves (to make into glovettes?)
-A few books to get text and pics from for jewelry, including a Big Book of Christmas and a couple French text books.

And for myself, I bought a wonderful old book of poetry and a silverplate tea server! I collect tiny tea sets. Even though its a little larger, it will look pretty in my collection. I paid $4 for it and from what I can see online, they were made in the 1800s. (WoW)  I also got two bottles of butane for my mini torch. A 6 oz bottle is only $2 there! Can't beat that with a stick. lol

I do enjoy going to the flea market, but it's a difficult thing for me to do. I suffer so badly from insomnia that I can cannot get up early like "normal people" to go to Saturday morning yard sales and the flea market. So it is a rare thing that I ever get to go.  If they would just change the time to 3-4am, I could be there . lol

Thursday, October 28, 2010

50 More Things - Silver tone this time!

I used up 50 more parts and pieces today! Yay! This time I dug in the silver toned drawer and found these 50 lovely charms to add.


50 Things Silvertoned

I love the little boy and girl kissing charm. So cute! I wonder if I will ever put a dent in my stash? *sigh*

I am not sure what "50 things" theme I will use for the next necklace. I am thinking maybe Flowers. :)

Wednesday, October 27, 2010

So Much Stuff! and 50 Of Those Things

Seriously, I have a weakness. I love to buy old and vintage jewelry. Sure, I buy by the piece, but also by the box load! I have storage drawers full; I have storage boxes full; I have boxes sitting on my floor full!

Time to get a move on and make some things that can help me to use it up.

  The first piece from my new line: "50 Things."


I'm going to start making Statement/Charm necklaces holding at least 50 items a pieces. This will help me to clear out my supplies in, hmmm, maybe 100 years? LOL


I do really love pieces like this. The first time I saw a statement/charm necklace on etsy, I was like wow! Love!

I just hope people will love mine :)

50 Things - Gold tone Available Here

Saturday, October 23, 2010

My Life Under The Bus Inspiration Challenge

Ok, so I am not sure when we are supposed to post these. I =think= it's today (Saturday) but I am not sure. I suffer greatly from insomnia, so I can't be up early in the morning to check to see if the blog hop links have been posted and if we are indeed supposed to be posting. So, I guess I will post my challenge piece now and hopefully it will be ok.

This challenge is from My Life Under the Bus. You can view the post here for the challenge or use the links to hop back to the challenge page. 

Here are the inspiration pics that we worked with this week:


A Beautiful palette of colors!!


And here is my work....
 I work with all sorts of materials, but my passion is old and/or vintage components. These beads were some I bought in a huge lot of vintage stuff. They look like glass but are actually plastic! The metal pendant ...was an earring! The colors matched the necklace beads perfectly, so I took it apart. It was a two piece earring, so I used the bottom for the necklace.


 I had plenty of the multi-colored beads left, so I decided to use the top part of the earring (post removed and drilled two holes in it) to make a matching bracelet.


I hope that you like my creations for this challenge!


 Please do post comments and if you aren't too blogged out, (I know some people follow a ton of blogs already) pleassssse follow me *Really Sad I-Don't-Have-Any-Followers-Puppy Dog Eyes*


Thanks!!